Saturday, November 17, 2018

Soft and Chewy Almond Cookies

We are rapidly approaching two years since my last post so I decided I couldn't let 2018 go by without sharing at least one recipe.  A lot has happened since January 2017, but my love of baking and all things sweet has remained the same.  As we approach the holidays, I had asked my husband to help me come up with a list of cookies to bake.  He suggested some almond flavored cookies, which is something I did not remember making before.  He wanted a soft and chewy cookie, as opposed to a crisp or crunchy one.  After combing the internet I settled on these, making only minor changes to size and baking time.  These turned out crisp on the outside, and soft and chewy in the center.  They also received the coveted Husband Seal of Approval!


SOFT AND CHEWY ALMOND COOKIES
Adapted slightly from Beyond Frosting

INGREDIENTS
1 cup (2 sticks) unsalted butter
2 cups granulated sugar
2 large eggs
1 teaspoon almond extract
3 cups all-purpose flour
1/2 teaspoon baking soda
1/2 teaspoon cream of tarter
Sliced almonds

DIRECTIONS
1. Combine the butter and sugar and beat on medium speed until well creamed together.

2. Add the eggs and almond extract. Mix into butter and sugar until the eggs are well beaten.

3. In a separate bowl, combine flour, baking soda and cream of tartar. Slowly add into batter and beat on medium low speed until well combined and dough forms.

4. Place round heaping tablespoons of dough onto a parchment paper lined baking sheet. Place 4-5 sliced almonds on top of the cookies. Refrigerate the dough for at least 1 hour.

5. Preheat the oven to 350 F. Place about 2 inches apart and bake at 350° F for 9-11 minutes until edges are set and centers are no longer shiny. Allow cookie to cool on the baking sheet for several minutes and then transfer to a wire rack to cool completely.

Monday, January 30, 2017

Cherry Almond Chocolate Bark

Whenever anyone comes to visit I always like to have some homemade cookies on hand. The last time my parents visited I still made some cookies, but I decided to change things up a bit with the addition of some chocolate bark. Bark is one of the easiest sweet treats to throw together, and the flavor combinations are endless. The tart cherries really complement the creamy dark chocolate in this version. You can stir all of the toppings into the chocolate before spreading on the baking sheet to cool, but I like to reserve one-third of each to add to the top because I think it looks more visually appealing. Based on how quickly this bark disappeared, I'm declaring it a winner!


CHERRY ALMOND CHOCOLATE BARK
Adapted from epicurious

INGREDIENTS
3/4 cup whole raw almonds
12 ounces dark chocolate (60 to 70 percent cocoa), chopped
1/3 cup dried tart cherries, coarsely chopped

DIRECTIONS
1. Heat oven to 350 degrees F. On a baking sheet lined with parchment paper or foil toast the almonds until fragrant and light gold, 8 to 10 minutes. Let cool completely; coarsely chop and transfer to a bowl.

2. Fill a medium saucepan with 1 inch water; bring to a simmer over medium-low heat. Set a large heatproof bowl atop the saucepan, making sure water doesn't touch the bottom of the bowl. Place 10 ounces dark chocolate in the bowl; cook, stirring until smooth. Remove bowl from saucepan; add the remaining 2 ounces dark chocolate and stir until smooth.

3. Stir in two-thirds of the toasted chopped almonds and two-thirds of the chopped dried cherries. Pour onto baking sheet; spread into an even layer about 1/4 inch thick. Sprinkle with the remaining chopped almonds and cherries, gently pressing to ensure almonds and cherries will stick to the chocolate. Refrigerate until firm, about 1 hour. Break into 24 pieces.

Monday, August 29, 2016

Peanut Butter Chocolate Chunk Cookies

I baked these cookies for someone who is lactose intolerant so I purposefully sought out a recipe that uses shortening instead of butter.  You could also make these cookies as traditional peanut butter cookies by leaving out the chocolate chips, flattening the dough balls slightly, and using the tines of a fork to make a cross hatch pattern on the top.  The taste and texture of these cookies is so good, you won't miss the butter!


PEANUT BUTTER CHOCOLATE CHUNK COOKIES
Adapted from Jif

INGREDIENTS
  • 3/4 cup creamy peanut butter
  • 1/2 cup shortening
  • 1 cup firmly packed brown sugar
  • 1/4 cup granulated sugar
  • 3 tablespoons milk
  • 1 tablespoon vanilla extract
  • 1 large egg
  • 1 3/4 cups unbleached all-purpose flour
  • 3/4 teaspoon baking soda
  • 3/4 teaspoon salt
  • 1 1/2 cups chocolate chunks

  • DIRECTIONS
  • 1. Preheat oven to 375°F. Coat baking sheet with parchment paper or non-stick cooking spray.

  • 2. In a large bowl, combine peanut butter, shortening, brown sugar, granulated sugar, milk and vanilla in large bowl. Beat at medium speed with electric mixer until well blended. Add egg and beat until incorporated.

  • 3. In a small bowl, combine flour, baking soda and salt. Add to creamed mixture at low speed. Mix just until blended. Stir in chocolate chunks. Drop by rounded tablespoonfuls 2 inches apart onto prepared baking sheet. Flatten slightly with the palm of your hand (cookies do not spread much).

  • 4. Bake 7 to 8 minutes or until set and just lightly browned. Cool 2 minutes on baking sheet. Remove to wire rack to cool completely.

Sunday, February 14, 2016

Sour Cream Sugar Cookies

Happy Valentine's Day! I had been wanting to try out this sour cream sugar cookie recipe for quite some time, but I usually only make cutout cookies for Christmas. I realized that I do own heart-shaped cookie cutters, so why not make some cutouts for Valentine's Day? Plus, I have it on good information that my valentine likes sugar cookies. The dough for these cookies, even after chilling, is one of the softest roll-out doughs I have ever used. Even though it was slightly difficult to work with, it turned out delightfully soft, fluffy cookies that should be enjoyed anytime of year.


SOUR CREAM SUGAR COOKIES
Adapted slightly from One Good Thing by Jillee

INGREDIENTS - COOKIES
3 cups all-purpose flour
2 teaspoons baking powder
1 teaspoon baking soda
1 teaspoon salt
1/2 cup shortening
1 cup sugar
2 large eggs
1 cup sour cream
1 teaspoon vanilla extract

INGREDIENTS - FROSTING
2 cups powdered sugar
2 tablespoons softened butter
1 teaspoon vanilla
2-3 tablespoons milk
food coloring (if desired)

DIRECTIONS
1.  In a medium bowl, combine the flour, baking powder, baking soda and salt. Set aside.

2. In the bowl of an electric mixer fitted with a paddle attachment, beat the shortening and sugar together on medium-high speed until soft and fluffy. Beat in the eggs one at a time, mixing well after each addition. Add the sour cream and vanilla and blend together until creamy. With the mixer on low speed, add in the dry ingredients 1/3 at a time mixing just until incorporated and evenly mixed. The dough will be very sticky.

3. Divide the dough into two portions and wrap each portion in plastic wrap. Chill the dough for 1-2 hours.

4. Preheat oven to 350 degrees and line cookie sheets with parchment paper or silicone mats. Using plenty of flour on your work surface and rolling pin, roll the dough to 1/4-inch thickness. Cut out shapes using floured cookie cutters. Bake cookies for 10-12 minutes until cookies are just barely beginning to brown on the outside. Cool completely before frosting.

5. Beat together all frosting ingredients, starting with 2 tablespoons of milk and adding more milk if needed to achieve a spreadable consistency. Spread frosting on cooled cookies.

Sunday, November 22, 2015

Overnight Cinnamon Rolls

It doesn't get much better than a fresh, homemade cinnamon roll in the morning.  However, I'm not willing to get up at 4 a.m. to start the process so this overnight receipe is perfect.  All of the work is done the day before, and you simply put them in the oven, enjoy a cup of coffee, and before you know it you are enjoying one of these beauties.  This recipe is easy to follow and received an enthusiastic two thumbs up from my resident food critic.


OVERNIGHT CINNAMON ROLLS
From Alton Brown

INGREDIENTS - DOUGH

4 large egg yolks, room temperature
1 large whole egg, room temperature
2 ounces sugar, approximately 1/4 cup
6 tablespoons unsalted butter, melted
1 teaspoon cold butter for greasing baking dish
3/4 cup buttermilk, room temperature
15 ounces all-purpose flour divided into 10 ounces, 4 ounces and 1 ounce batches
1 package rapid rise yeast, approximately 1/4 ounce
1 1/4 teaspoons kosher salt

INGREDIENTS - FILLING

8 ounces light brown sugar
1 tablespoon cinnamon, ground
Pinch kosher salt
1 1/2 tablespoons unsalted butter, melted
INGREDIENTS - ICING

2 1/2 ounces cream cheese, softened
3 tablespoons milk, room temperature
5 1/2 ounces confectioners' sugar

DIRECTIONS
1. For the Dough - Combine the egg yolks, whole egg, sugar, butter and buttermilk in the bowl of a stand mixer and whisk at medium speed.

2. As the mixture comes together add 10 ounces of the flour, along with the yeast and salt and continue whisking until combined.

3. Remove the whisk attachment and replace it with a dough hook. Add another 4 ounces of the remaining flour and knead on low speed for 5 minutes. At this point the dough should feel soft and moist but not sticky. If it is sticky, add a bit more flour (one ounce at a time). Knead on low for another 5 minutes or until the dough clears the sides of the bowl.

4. Turn the dough out onto a lightly floured work surface; and form dough into a smooth ball. Transfer to a large bowl that has been lightly coated with the vegetable oil. Rotate the bowl so that the dough ball is evenly covered. Cover with a clean kitchen towel and set aside until the dough doubles in volume, about 3 hours. (Exact times will vary depending on the temperature of the room and the temperature of the ingredients.)

5. For the Filling - Combine the brown sugar, cinnamon and salt in a medium bowl and set aside.

6. To Assemble - Butter a 9 by 13-inch glass baking dish with the cold butter.

7. Turn the dough out onto a lightly floured work surface and gently shape into a rectangle with the long side nearest you. Then use a rolling pin to shape into 18 by 12-inch rectangle.

8. Brush the dough with the the melted butter, leaving a 1-inch border along the top edge.

9. Sprinkle the brown sugar mixture over the dough, also avoiding the top border. Gently press the filling into the dough. (If you tend to have hot hands, you may want to cover the filling with a layer of plastic wrap first.)

10. Beginning with the long edge nearest you, roll the dough away from you into a tight cylinder. Firmly pinch the seam to seal and roll the cylinder seam side down. Very gently squeeze the cylinder to create even thickness.

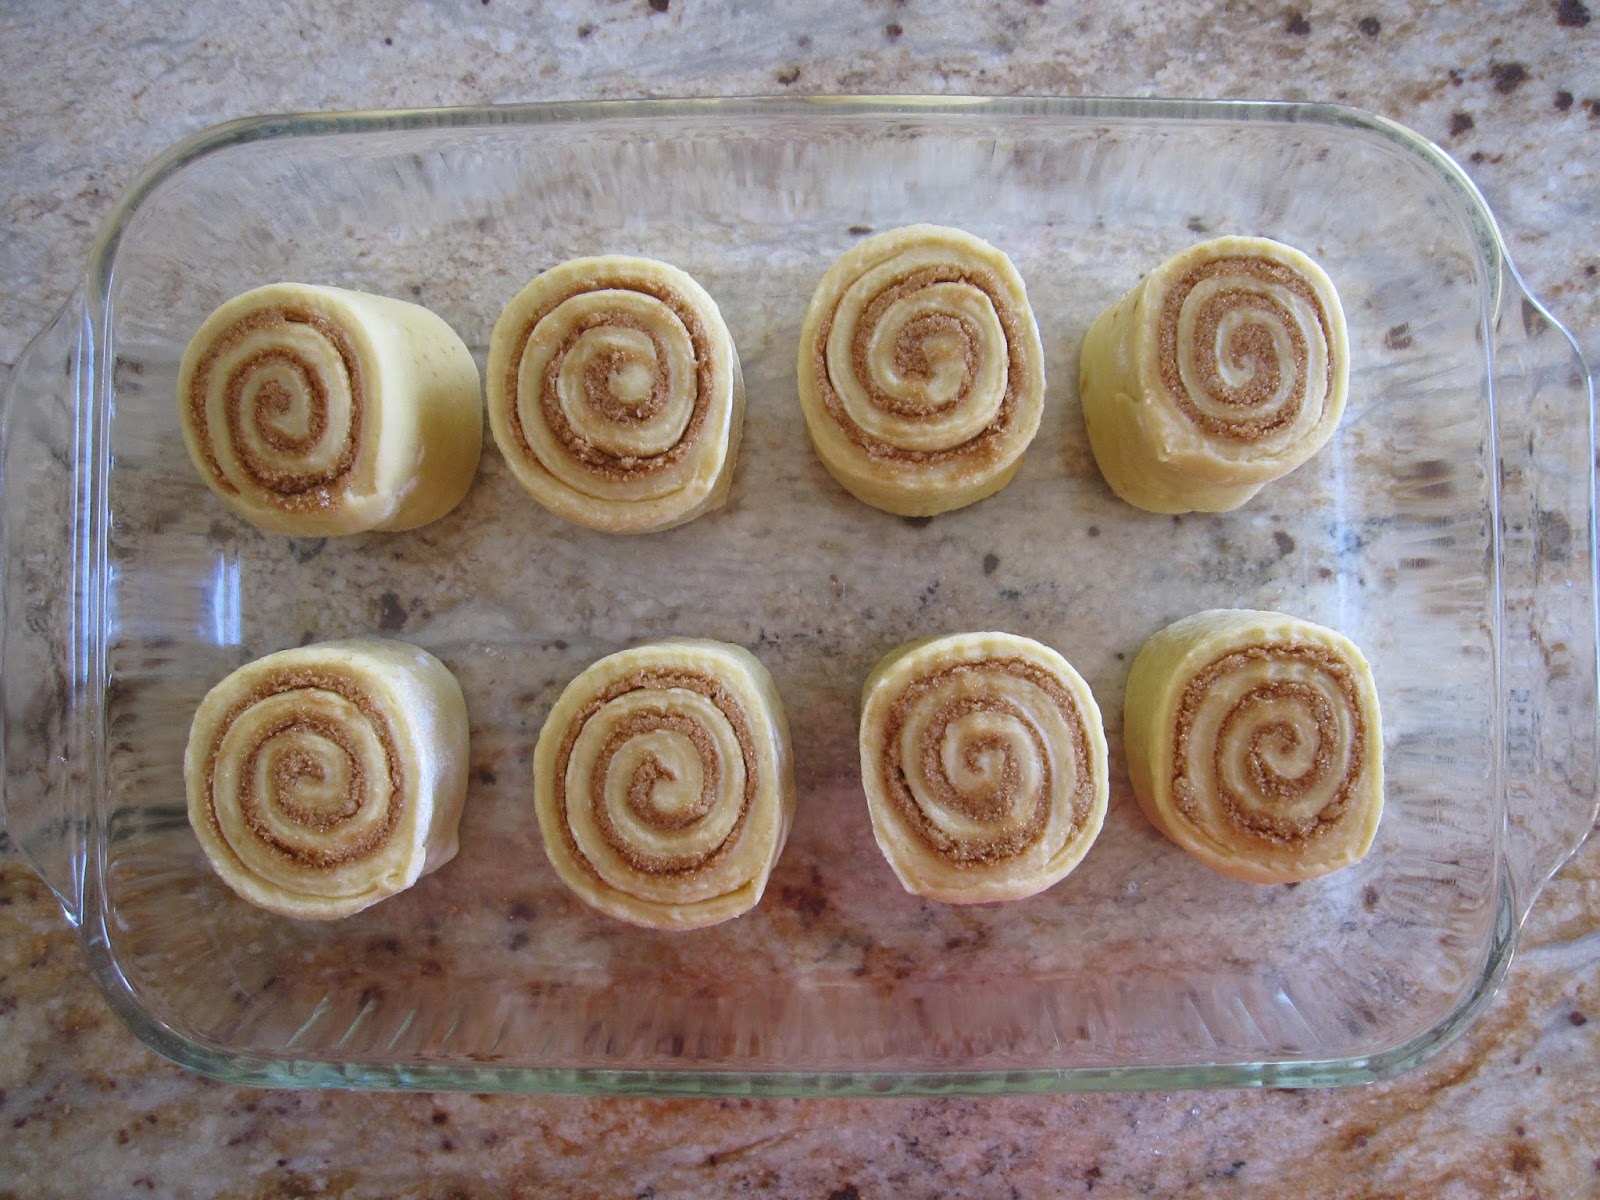
11. Using a serrated knife, gently cut the cylinder into 2-inch rolls; yielding 8 pieces.Arrange rolls cut side down in the baking dish; cover tightly with plastic wrap and store in the refrigerator overnight, or up to 16 hours.

12. To Bake - Heat the oven to 200 degrees F.

13. When the oven has reached 200 degrees F, turn it off and place the rolls in the turned-off oven. Let the rolls rise until they look slightly puffy, about 30 minutes.

14. Without taking the rolls out of the oven, increase the oven temperature to 350 degrees F and let the rolls continue to bake for 25 to 30 minutes, or until the internal temperature reaches 190 degrees F. Remove the rolls and let cool while you make the icing.

15. For the Icing - Whisk the cream cheese in the bowl of a stand mixer until creamy. Add the milk and whisk until combined. Sift in the powdered sugar, and whisk until smooth. Spread over the rolls and serve immediately.


Sunday, August 30, 2015

Banoffee Pie with Dulce de Leche

Yesterday was rainy and gray, so to brighten our spirits I decided to make a pie.  We talked about different options and then settled on banoffee, which is an English pie traditionally made of bananas, toffee, and cream.  I believe that in traditional recipes you make the toffee or dulce de leche by boiling a can of sweetened condensed milk, but I skipped this step and opted for canned dulce de leche instead.  I believe it is also more traditional to make a cookie crust from English digestive biscuits, but my main pie eating guy requested a regular pastry crust instead so of course I complied.  The end result was delicious, with the lightly sweetened whipped cream perfectly complimenting the rich dulce de leche topped with sliced bananas.  I know this one was a hit because 24 hours after we dug in there is only one slice left, and I may or may not have found someone happily eating pie for breakfast this morning as well.


BANOFFEE PIE WITH DULCE DE LECHE
Recipe from Hannah's Kitchen

INGREDIENTS
1 9-inch pastry shell, cooked and cooled
1 13-14 ounce can dulce de leche
3 large bananas
1 cup heavy whipping cream
1 tablespoon powdered sugar
1 square semi-sweet chocolate (optional)

DIRECTIONS
1. Set pastry shell aside. In a small saucepan, heat the dulce de leche until it is smooth. Pour the dulce de leche into the pastry shell and refrigerate until cooled. Once cooled, slice bananas and cover the dulce de leche.

2. In a large mixer bowl with a whisk attachment, beat cream and powdered sugar until stiff peaks form. Spread whipped cream over bananas. Grate chocolate over the cream, if desired.

3. Chill at least two hours before enjoying. Pie is best eaten on the day it is made.

Wednesday, July 8, 2015

Oreo Chocolate Cake

Usually, I spend weeks before my birthday pouring over cookbooks and clicking through food blogs in search of a fabulous cake to bake for myself. Life just got in the way this year and before I knew it, it was the Sunday before my Monday birthday. I almost broke down and bought a cake, but then I saw a package of Oreos during my morning grocery store run and decided that I would make a simple and delicious cake starring this pantry staple. I used Hershey's classic Perfectly Chocolate Cake for the cake recipe, and then I threw together some crushed Oreos with my favorite vanilla buttercream for the frosting. I ended up making half the cake recipe and pouring it into three 6-inch round pans to make a small cake since there were only two of us enjoying this one (although, there is absolutely nothing wrong with making a 9-inch cake for two people!).  I also used half of the frosting recipe for my small cake.  The recipe below makes one 2-layer cake, but you can easily make one and a half times the cake and frosting to bump it up to a large 3-layer cake. If you are planning on piping the frosting, make sure you really finely crush the cookies so they don't clog your piping bag. Oh, and I have to add that a half batch of the frosting tastes amazing on a 9x13-inch pan of brownies!


OREO CHOCOLATE CAKE

INGREDIENTS - CAKE
2 cups sugar
1-3/4 cups all-purpose flour
3/4 cup HERSHEY'S Cocoa
1-1/2 teaspoons baking powder
1-1/2 teaspoons baking soda
1 teaspoon salt
2 eggs
1 cup milk
1/2 cup vegetable oil
2 teaspoons vanilla extract
1 cup boiling water

INGREDIENTS - FROSTING
2 sticks (8 ounces) unsalted butter, softened
6-7 cups powdered sugar
1teaspoon vanilla extract
4-6 tablespoons milk
16 Oreo cookies, finely crushed
pinch of salt
additional Oreo cookies for topping, if desired

DIRECTIONS
1. For the cake - preheat oven to 350°F. Grease and flour two 9-inch round baking pans.

2. Stir together sugar, flour, cocoa, baking powder, baking soda and salt in large bowl. Add eggs, milk, oil and vanilla; beat on medium speed of mixer 2 minutes. Stir in boiling water (batter will be thin). Pour batter into prepared pans.

3. Bake 30 to 35 minutes or until wooden pick inserted in center comes out clean. Cool 10 minutes; remove from pans to wire racks. Cool completely before frosting.

4. For the frosting - beat together the butter, powdered sugar, and vanilla extract. Add milk as needed and beat until fluffy. Add in crushed Oreo cookies, mixing until combined. 

5. Frost cooled cake. Top with additional chopped Oreo cookies if desired.

Sunday, May 31, 2015

Deep Dark Fudgy Brownies

At least once every few years my quest for the perfect brownie picks up steam and leaves me scouring cookbooks and blogs for new recipes to try. The last three weekends I have baked three different brownie recipes, and this is my favorite of the group. I was skeptical of a brownie recipe that uses all oil and no butter, but these were so dark and rich that I didn't miss the butter.  This brownie bakes up thick and fudgy with a wonderfully chewy texture.  I had to quickly put the bulk of the brownies in the freezer to prevent me from eating them all.


DEEP DARK FUDGY BROWNIES
Adapted from King Arthur Flour

INGREDIENTS
2/3 cup (2 ounces) dutch processed cocoa powder
1 1/2 cups (10 1/2 ounces) granulated sugar
1/2 cup (2 ounces) confectioners’ sugar
3/4 teaspoon salt
1 cup (4 1/4 ounces) unbleached all-purpose flour

1 teaspoon instant espresso powder
1 cup (4 ounces) toasted pecans or walnuts, diced (optional)
1 cup (6 ounces) semisweet chocolate chips

3 large eggs
1/2 cup (3 1/2 ounces) vegetable oil
2 tablespoons (1 ounce) water


DIRECTIONS
1. In a large mixing bowl, whisk together the cocoa, sugars, salt, flour, espresso powder, nuts, and chips. Add the eggs, oil, and water, mixing just until smooth. Spoon the mixture into a lightly greased 8 x 8" or 9 x 9" square pan, smoothing the top.

2. Bake the brownies in a preheated 350°F oven for about 35 minutes (for the 9" pan), or 45 minutes (for the 8" pan). To see if the brownies are done, remove the pan from the oven, and stick the tip of a sharp knife into the center of the brownies. Wriggle it around just enough to see what’s going on. Is the batter under the crust still shiny, wet, and smooth? Continue to bake the brownies, checking frequently. Is it ultra-moist, but not shiny, and “crumby” looking? Take them out, they’re done.

3. Place the pan of brownies on a cooling rack, and allow them to cool for 1 hour before slicing.

Sunday, April 12, 2015

Snickerdoodle Blondies

We are big lovers of snickerdoodle cookies at my house, and these bars are a wonderful twist on the classic.  They are thick and chewy with a cinnamon sugar ribbon and a crackly cinnamon sugar top.  I've made these blondies multiple times, and they have received the highly sought after but rarely awarded Husband Seal of Approval. Fair warning though - these are highly addictive!


SNICKERDOODLE BLONDIES
Adapted slightly from Sally's Baking Addiction

INGREDIENTS - BLONDIES

2 and 1/3 cups (292g) all-purpose flour
1 and 1/4 teaspoon baking powder
1/2 teaspoon salt
3/4 cup (170g) unsalted butter, softened to room temperature
3/4 cup (150g) granulated sugar
3/4 cup (150g) packed light brown sugar
2 large eggs, room temperature
2 teaspoons vanilla extract
1 cup (180g) white chocolate chips

INGREDIENTS - CINNAMON SUGAR FILLING

2 teaspoons ground cinnamon
1/3 cup (67g) granulated sugar

DIRECTIONS
1.  Preheat oven to 350F degrees. Line a 9x9 inch baking pan with aluminum foil or pan-lining papger, leaving enough overhang on the sides to easily pull the blondies out of the pan and cut.

2. In small bowl, combine flour, baking powder, and salt. Set aside.

3. Using a hand or stand mixer fitted with a paddle attachment, beat the butter on high speed in a large bowl. Beat for at least 1 minute until creamy. Add sugars and beat for 2 full minutes on high speed until light and fluffy. Scrape down the sides and bottom of bowl as needed. Beat in the eggs and vanilla on high speed, scraping down the sides and bottom of the bowl as needed. On low speed, beat in dry ingredients until just combined. With a large wooden spoon or rubber spatula, fold in the white chocolate chips.

4. Spoon half the batter into pan. It will be a relatively thin layer, but try to spread it across the pan evenly. Combine the cinnamon and sugar and sprinkle on top of them bottom layer, reserving 1 tablespoon for the top. Spread the remaining batter over top. Some of the cinnamon-sugar will mix into the top layer as you spread it, which is fine. Sprinkle the top with the remaining cinnamon-sugar.

5. Bake for 30-35 minutes or until golden brown and a toothpick inserted in the center comes out clean. Cool completely before cutting into bars.

Sunday, February 1, 2015

Thick Fudgy Brownies

Some occasions just call for brownies, and one such occasion is definitely Super Bowl Sunday.  While I enjoy all of the other traditional big game foods, I feel like I have to end my overeating on a sweet note.  I made these today and they fit the bill!  These brownies are nice and thick with a wonderfully crackly top.  They are delicious on their own, but would also be amazing as the base of a brownie ice cream sundae.


THICK FUDGY BROWNIES
Adapted from Tasty Kitchen

INGREDIENTS 
1 1/2 cups + 3 tablespoons granulated sugar 
3/4 cup butter, melted 
2 tablespoons water 
2 whole eggs 
1 teaspoon vanilla extract 
1 1/3 cups all-purpose flour 
3/4 cup cocoa powder 
1/2 teaspoon baking powder 
1/4 teaspoon salt
1 cup dark chocolate chips

DIRECTIONS
1. Preheat oven to 375 degrees F. Grease or line an 8x8-inch baking pan with parchment paper and set aside.

2. Combine sugar, butter, and water in a large bowl. Stir in eggs and vanilla extract. Set aside.

3. Combine flour, cocoa, baking powder and salt in a medium bowl; stir this into the sugar mixture. Fold in chocolate chips. Spread into prepared baking pan.

4. Bake for 30-45 minutes or until a wooden pick inserted in center comes out slightly sticky. Cool completely in pan on wire rack. Cut into bars.

Tuesday, November 25, 2014

White Chocolate Butterscotch Cookies

I made these cookies this past summer and I can't believe they haven't made it onto the blog until now!  I was in the mood to bake something new, so I starting flipping through some of my cookbooks.  This recipe looked interesting, and I had never made anything like it.  Definitely do not substitute for the dark brown sugar, as it is essential to the rich butterscotch flavor in these cookies.  I took these babies to work and they were beyond popular.  I had more than one person tell me that these were probably the best cookies they had ever tasted.  I highly recommend these, especially if you are looking to step outside the chocolate chip cookie box.
WHITE CHOCOLATE BUTTERSCOTCH COOKIES
Adapted slightly from Martha Stewart's Baking Handbook

YIELD - 2 DOZEN COOKIES

INGREDIENTS

1 3/4 cups unbleached all-purpose flour
1/2 teaspoon baking soda
1/2 teaspoon salt
2 tablespoons unsalted butter, room temperature
3/4 cup shortening, room temperature
1 1/4 cups packed dark brown sugar
1 large egg
1 tablespoon pure vanilla extract
8 ounces best-quality white chocolate, chopped into 1/4-inch pieces

DIRECTIONS
1. Preheat oven to 350 degrees F.  Line two large baking sheets with parchment paper and set aside.

2. In a medium bowl, whisk together flour, baking soda, and salt; set aside.

3. In the bowl of an electric mixer fitted with the paddle attachment, beat the butter, shortening, and brown sugar on medium speed until light and fluffy, about 3 minutes, scraping the bowl as needed. Beat in the egg and the vanilla until combined. With the mixer on low speed, add the flour mixture in two batches, beating just until combined. Stir in the white chocolate.

4. Drop 2 tablespoons of dough at a time about 2 inches apart on prepared baking sheets.  Bake until lightly golden brown around the edges, about 10-12 minutes.  Let cookies cool on sheets for 2 minutes, then transfer to a wire rack to cool completely.

Wednesday, October 1, 2014

Vanilla Wafer Cake

We were having a conversation about cakes at work a couple of weeks ago and one of my co-workers asked if I had ever made a vanilla wafer cake.  I had never heard of such a cake, and I was intrigued that crushed vanilla wafers were used in place of flour.  After doing more research online, it appears that many good southern kitchens have been baking this cake for generations.  There are two main versions of this recipe - one that uses butter and one that does not.  I opted to make the version with butter, although I would be interested to do a comparison with the butter-less cake as well.  The end result of this "research project" yielded a wonderfully moist, dense cake.  You would never know that there were crushed vanilla wafers in the batter!


VANILLA WAFER CAKE
Adapted from allrecipes.com

INGREDIENTS
1 1/2 cups sweetened flaked coconut
1 cup pecans, chopped very fine (I used a food processor)
3/4 cup butter, softened
1 1/2 cups white sugar
6 eggs
1 (12 ounce) package vanilla wafers, crushed very fine (I used a food processor)
1/2 cup milk

DIRECTIONS
1. Preheat oven to 325 degrees F (165 degrees C). Grease and flour a 10-cup capacity bundt pan. I used a generous amount of baking spray with flour. Mix together the coconut and ground pecans; set aside. 

2. In a large bowl, cream together the butter and sugar until light and fluffy. Beat in the eggs one at a time. Beat in the crushed wafers alternately with the milk. Mix in the coconut and ground pecans. Pour batter into prepared pan. 

3. Bake in the preheated oven for 60 minutes, or until a toothpick inserted into the center of the cake comes out clean. Allow to cool in the pan for 10 minutes before turning out onto a wire rack to cool completely.

Saturday, September 20, 2014

Southern Coconut Cake

I made this lovely cake for my birthday back in early July.  I had never made a coconut cake before, but I like coconut and I was up for trying something new.  Since there are only two of us in the house I decided to halve the recipe and bake the cakes in two 6-inch round pans.  While I'm sure we could have polished off a three-layer 8-inch round cake, we had just returned from a trip to Austin where we ate everything, so a little moderation wasn't such a bad idea.  This cake has a great coconut flavor, and the coconut milk keeps the layers from baking up dry.  If you can't find unsweetened coconut you can definitely use sweetened coconut for the topping.


SOUTHERN COCONUT CAKE
Recipe adapted from Completely Delicious

INGREDIENTS - CAKE
5 large egg whites
1/2 cup (118 ml, 4 fl oz) whole milk
1 tablespoon coconut flavoring
3 cups (340 grams) cake flour
2 1/3 (470 grams) cups sugar
4 1/2 teaspoons baking powder
1/2 teaspoon salt
1 cup (226 grams) unsalted butter, room temperature
1 cup (237 ml, 8 fl oz) unsweetened coconut milk

INGREDIENTS - FROSTING
12 ounces (340 grams) cream cheese, room temperature
3/4 cup (170 grams) unsalted butter, room temperature
5 1/2 cups (683 grams) powdered sugar, sifted
1-3 tablespoons unsweetened coconut milk or regular milk
1 1/2 teaspoon coconut flavoring
1 cup (85 grams) unsweetened coconut

DIRECTIONS
1. For the cake - Preheat oven to 350 degrees. Butter and flour three 8-inch cake pans and line with parchment paper.

2. Put the egg whites in a bowl and whisk slightly. Add the 1/2 cup milk and coconut flavoring and mix thoroughly. Set aside.

3. In the bowl of a stand mixer fitted with a paddle attachment, combine the flour, sugar, baking powder, and salt. Add the butter and coconut milk and combine on low speed until moistened. Increase speed to medium and beat until light and fluffy, about 2 minutes, scraping down the sides of the bowl as needed. Add the egg white mixture in 3 additions, scraping down the sides of the bowl and mixing just long enough to incorporate between additions.

4. Divide the batter among the prepared pans and bake for 28-30 minutes or until a toothpick inserted into the center comes out clean. Allow the cakes to cool in their pans for 10 minutes, then turn them out onto cooling racks to cool completely.

5. For the frosting - Beat together the butter, cream cheese, and powdered sugar on medium high speed until light and creamy. Add the coconut flavoring and enough coconut milk (or regular milk) to reach a spreadable consistency. Mix until smooth.

6. Spread the coconut on a sheet pan. Toast in a 350 degree oven until golden, checking every 2 minutes. Watch it carefully, the coconut will burn fast. Let it cool completely.

7. Frost the cake and cover the frosted cake with the toasted coconut.

Thursday, August 7, 2014

Chewy Toffee Blondies

These bars started with an impulse buy at the grocery store.  I was waiting in line to check out, and as I was standing there something caught my eye.  Heath candy bars were buy three, get two free!  If that's not a deal then I don't know what is.  Naturally, I grabbed five candy bars and tossed them into the shopping cart.  I decided that I needed to bake something with the candy bars, and these blondies seemed like the perfect vehicle for the job.  I chopped the candy quite coarsely, which paid off by leaving large in-tact chunks in the final product.  If you chop the candy too finely it may just melt into the bars and you will lose that classic toffee crunch.  Browning the butter imparts a rich, nutty flavor, but if you don't want to spend the time to do this, you can simply melt the butter and proceed.  These bars are sure to please any toffee lover!


CHEWY TOFFEE BLONDIES
Adapted from Smitten Kitchen

INGREDIENTS
8 ounces (1 stick) butter, browned
1 cup (7 3/4 ounces) brown sugar
1 large egg
1 teaspoon vanilla extract
1/4 teaspoon salt
1 cup (4 3/8 ounces) all-purpose flour
1 cup coarsely chopped Heath Bars (about 4 - 1.4 ounce bars)

DIRECTIONS
1. Coat an 8 x 8 pan with non-stick spray or line with parchment paper. Preheat oven to 350 degrees F.


2. Melt 1/2 cup butter in a 2-quart heavy saucepan over medium heat. Cook, stirring constantly and watching closely, until butter just begins to turn golden brown (about 6-8 minutes). Immediately remove from heat.

3. In a large bowl, mix browned butter and brown sugar until smooth. Beat in egg, then add vanilla extract. Stir in salt and flour until just combined. Add the chopped candy bars and stir until just incorporated.

4. Pour and spread batter into prepared pan. Bake 20-25 minutes or until set in the middle, taking caution not to overbake. Cool on a rack before cutting into bars.

Sunday, June 22, 2014

Mini Banana Chocolate Chip Muffins

Mini muffins are undeniably cute, but I don't make them often because those mini muffin pans are such a pain to clean.  I had some old bananas lying around so I decided to give in to the lure of the mini muffin.  These are great warm from the oven, and they also freeze well.  You could definitely replace the mini chocolate chips with finely chopped walnuts or pecans if you prefer, and whole wheat flour may be substituted for up to half of the all-purpose flour.
MINI BANANA CHOCOLATE CHIP MUFFINS
Adapted from Taste of Home

INGREDIENTS
1 1/2 cups all-purpose flour
1 cup sugar
1 teaspoon baking soda
1/2 teaspoon salt
1/2 teaspoon cinnamon
3 medium very ripe bananas
1 egg
1/3 cup vegetable oil
1 teaspoon vanilla extract
1/2 cup miniature semi-sweet chocolate chips

DIRECTIONS 
1. Preheat oven to 375 degrees F. Coat two mini muffin pans with non-stick spray, or grease the pans.

2. In a large bowl, combine dry ingredients. In another bowl, mash the bananas. Add egg, oil and vanilla; mix well. Stir the wet ingredeints into the dry ingredients just until moistened. Fold in the chocolate chips. Fill mini muffin cups 3/4 full. 

3. Bake muffins for 10-12 minutes or until a toothpick inserted near the center comes out clean. Cool for 10 minutes; remove from pan to a wire rack to cool completely.


Friday, June 13, 2014

Salty Chocolate Chip Cookies

Chocolate chip cookies are pretty great, and you can never really have too many chocolate chip cookie recipes.  While I have a couple of favorites, I am always up for trying something new.  These cookies have a nice chewy bite, courtesy of the ground oats, and a subtle salty finish.  My husband, and toughest critic, really enjoyed these.  I took the bulk of the batch to work and they were well liked by the masses, with many people commenting on how much they liked the touch of salt.
SALTY CHOCOLATE CHIP COOKIES
Adapted from Grant

INGREDIENTS
  • 1 1/2 cups old-fashioned oats 
  • 3 cups all-purpose flour 
  • 1 1/2 teaspoon baking soda
  • 1 1/2 teaspoon baking powder
  • 1 teaspoon kosher salt (plus more for finishing)
  • 1 1/4 cups (2 1/2 sticks) unsalted butter, room temperature
  • 1 1/2 cups packed light-brown sugar
  • 1 cup granulated sugar
  • 2 large eggs
  • 1 teaspoon vanilla extract
  • 2 1/2 cups semi-sweet chocolate chips 
  • - See more at: http://www.rachaelrayshow.com/recipe/18100_grant_s_chocolate_chip_cookies/index.html#sthash.vzgG5aG4.dpuf
    1 1/2 cups old-fashioned oats
    3 cups unbleached all-purpose flour
    1 1/2 teaspoons baking soda
    1 1/2 teaspoons baking powder
    1 teaspoon kosher salt (plus more for finishing)
    1 1/4 cups (2 1/2 sticks) unsalted butter, softened
    1 1/2 cups packed light brown sugar
    1 cup granulated sugar
    2 eggs
    1 teaspoon vanilla extract
    2 1/2 cups semi-sweet chocolate chips

    DIRECTIONS
    1. Preheat oven to 350 degrees F.  Line cookie sheets with parchment paper.

    2. In a food processor, process oats until they become a coarse flour. In a bowl, whisk together the processed oats, flour, baking soda, baking powder, and salt.

    3. In the bowl of a stand mixer, cream the butter and sugars on medium-high speed until light and fluffy, about 3-4 minutes. Reduce speed to low and add eggs.  Increase speed and beat until eggs are fully incorporated into the batter.  Mix in vanilla.  Slowly add the dry ingredients in batches (to avoid making a mess), and beat just until the last of the dry ingredients are mixed in.  Stir in chocolate chips.

    4. Scoop cookie dough by heaping tablespoonfuls onto prepared cookie sheets.  Bake for 11-13 minutes until just set around the edges.  Sprinkle warm cookies with a little extra salt and allow to cool on the cookie sheets for five minutes before removing to a wire rack to cool completely.

    Monday, May 26, 2014

    Chewy Chocolate Chip Brownies

    I knew I wanted to bake something today, but I wasn't sure what that should be.  This morning I poured over several cookbooks and some food blogs, and I decided it was as good a time as any to continue on my quest to find the perfect brownie.  I am one of those people who prefer the fudgy brownie to the cakey brownie.  I have to say, this one is pretty darn good.  The recipe calls for browned butter, but I really couldn't taste the nutty flavor imparted by browning in the final product.  I think if you wanted to cut down on prep time you could definitely make these with plain old melted butter.  The final product is chocolatey, chewy, and worth every single calorie.


    CHEWY CHOCOLATE CHIP BROWNIES
    Adapted from Cookie and Kate

    INGREDIENTS

    10 tablespoons unsalted butter, cut into ½-inch chunks
    1 cup granulated sugar
    1/4 cup brown sugar
    3/4 cup natural unsweetened cocoa powder
    1/4 teaspoon salt
    1/4 teaspoon baking powder
    1/2 teaspoon espresso powder (optional)
    2 cold large eggs
    1 1/2 teaspoons vanilla extract
    2/3 cup unbleached all-purpose flour
    1/2 cup chocolate chips

    DIRECTIONS
    1. Preheat the oven to 325 degrees F with a rack in the lower third of the oven. Line an 8-inch square baking pan with two criss-crossed pieces of parchment paper, making sure that the paper is long enough to go up the sides a couple of inches. Alternatively, line the pan with Reynolds pan-lining paper.

    2. Brown the butter: Melt the butter in a medium-sized saucepan over medium heat. Continue to cook the butter, while whisking constantly, until it’s a pale golden brown and the particles suspended in it are reddish brown. This usually takes about 10 minutes.  Be careful not to burn the butter!

    3. Remove the pan from heat and stir in the sugar, cocoa powder, sea salt, baking powder and espresso powder. Let the mixture cool for 5 minutes.

    4. Add the eggs one at a time, beating vigorously with a wooden spoon or silicone spatula after each one. When the mixture looks thick, shiny and well blended, add the vanilla extract and the flour. Stir until you no longer see streaks of flour. Then beat vigorously for 50 strokes with the wooden spoon or spatula.

    5. At this point, the mixture should be no more than slightly warm (if not, let it cool for a few more minutes). Fold in the chocolate chunks or chips - if the batter is too warm you will melt your chips and that would be sad.

    6. Spread the batter evenly in the lined pan. Bake on the lower rack for about 25 minutes, until a toothpick inserted in the center comes out with a few moist crumbs. Cool the brownies in the pan on a baking rack.

    7. Once the brownies are completely cool, lift the edges of the parchment paper and transfer the brownies to a cutting board. Use a sharp chef's knife to cut the brownies into 16 or 25 squares.

    Friday, May 2, 2014

    RumChata Cupcakes

    I was a little late to the party, but I have finally discovered RumChata.  I've heard it described as liquid Cinnamon Toast Crunch, and it is basically a creamy, sweet, cinnamon-flavored liqueur.  While RumChata is fabulous on its own, I really love the flavor it gives to both the cake and frosting.  The frosting is pretty sweet, but sometimes you just have to live a little bit!  Also, you may just want to add the sugar slowly and adjust the amount according to your tastes.  These cupcakes are for adults only and would be perfect for a girls night.

    RUMCHATA CUPCAKES
    Cake adapted from Annie's Eats 
    Frosting adapted from love.life. & creative things.

    YIELD - Approximately 30 cupcakes

    INGREDIENTS - CUPCAKES
    3 cups cake flour
    1 tablespoon baking powder
    1/2 teaspoon salt
    2 teaspoons cinnamon
    16 tablespoons unsalted butter, at room temperature
    2 cups sugar
    5 large eggs, at room temperature
    1 1/4 cups RumChata, at room temperature
    2 teaspoons vanilla extract

    INGREDIENTS - FROSTING
    12 ounces cream cheese, room temperature
    8 tablespoons butter, room temperature
    1/2 teaspoon vanilla
    dash of salt
    5 tablespoons RumChata
    1 2-pound package powdered sugar

    DIRECTIONS
    1. For the cupcakes - Preheat the oven to 350 degrees F and line two cupcake pans with paper liners. In a medium mixing bowl, combine the cake flour, baking powder, salt, and cinnamon.  Whisk together and set aside.  Add the butter and sugar to the bowl of an electric mixer fitted with the paddle attachment.  Beat on medium-high speed for 3 minutes, until light and creamy in color, occasionally scraping down the sides.

    2. Mix in the eggs one at a time until incorporated.  Scrape down the sides of the bowl after each addition.  Combine the RumChata and the vanilla extract in a liquid measuring cup.  With the mixer on low speed, add the dry ingredients alternately with the wet ingredients, beginning and ending with the dry ingredients and mixing just until incorporated.

    3. Divide the batter between the prepared paper liners, filling each about 2/3 of the way full (you will likely have batter left over after filling 24 wells).  Bake 18-22 minutes, or until a toothpick inserted in the center comes out clean.  Allow to cool in the pans for five minutes, then transfer to a cooling rack to cool completely before frosting.  Replace paper liners and bake remaining batter if desired.

    4. For the frosting - In a large mixer bowl, beat the butter and cream cheese until smooth.  Add salt and vanilla extract and beat to combine.  Slowly add the powdered sugar and then begin to add the RumChata.  Depending on how think you like your frosting (or whether or not you use all of the powdered sugar) you may need to add more or less RumChata.  Once all the RumChata and powdered sugar have been added, continue mixing until light and fluffy.  Fill a piping bag or spread on the cooled cupcakes.

    Sunday, April 27, 2014

    Cinnamon Chip Scones

    I bought several bags of cinnamon chips this past holiday baking season, and these scones were definitely worth the use of some of my precious chips.  You can find cinnamon chips at some retailers during the non-holiday season if you are lucky, or you can always order them online.  These scones are delicious warm out of the oven, but they are also still tasty once cooled.  Don't skip the coarse sugar on top - it really adds something special.  Also don't let these terrible photos deter you.  The scones do not look like tumors in person!


    CINNAMON CHIP SCONES
    Adapted slightly from Taste of Home

    INGREDIENTS
    3 1/4 cups unbleached all-purpose flour
    1/3 cup sugar
    2 1/2 teaspoons baking powder
    1/2 teaspoon baking soda
    1/2 teaspoon salt
    3/4 cup cold butter, cubed
    1 cup buttermilk
    1 package (10 ounces) cinnamon baking chips
    2 tablespoons butter, melted
    2 tablespoons coarse sugar

    DIRECTIONS 
    1. In a large bowl, combine the flour, 1/3 cup sugar, baking powder, baking soda and salt. Cut in butter until mixture resembles coarse crumbs. Stir in buttermilk just until moistened. Fold in chips. 

    2. Turn onto a lightly floured surface; knead gently 10-12 times or until dough is no longer sticky. Divide in half; gently pat or roll each portion into a 7-in. circle. Brush with butter and sprinkle with coarse sugar. 

    3. Cut each circle into six wedges. Separate wedges and place on an ungreased baking sheet. Bake at 425° for 10-13 minutes or until lightly browned. Serve warm.

    Sunday, February 9, 2014

    Apple Pecan Bread

    After perusing all of the new cookbooks I got for Christmas, I am now starting to work my way through the list I made of must-try recipes.  This bread appeared in the Better Homes and Gardens newest book, "Baking."  I made a couple of minor changes (added cinnamon, omitted raisins) and was pleased with the results.  I don't make a lot of quick breads outside of variations on banana, so this was a fun way to step outside the box.  The shredded apples keep the bread really moist, and the pecans and streusel provide a nice contrasting crunch.


    Apple Pecan Bread
    Adapted slightly from Better Homes and Gardens

    INGREDIENTS - BREAD
    1/2 cup butter, softened
    1 cup sugar
    1/4 cup buttermilk
    2 teaspoons baking powder
    2 eggs
    1 teaspoon vanilla
    2 cups all-purpose flour 
    3/4 teaspoon cinnamon
    1/2 teaspoon salt
    2 cups shredded, peeled apple (about 4 medium)
    1 cup chopped pecans
     
    INGREDIENTS - STREUSEL TOPPING
    1/4 cup packed brown sugar
    3 tablespoons all-purpose flour
    2 tablespoons butter
    1/3 cup chopped pecans
     
    DIRECTIONS 
    1. Preheat oven to 350 degrees F. Grease the bottom and sides of an 9x5x3-inch loaf pan; set aside. 
     
    2. In a large bowl, beat butter with an electric mixer on medium to high speed for 30 seconds. Beat in sugar until combined. Add buttermilk and baking powder; beat until combined. Add eggs and vanilla; beat until combined. Add flour, cinnamon, and salt; beat until combined. Stir in shredded apple and nuts. 
     
    3. Spoon batter into prepared pan; spread evenly. Sprinkle streusel topping over batter. Bake for 60 to 65 minutes or until a wooden toothpick inserted near the center comes out clean. 
     
    4. Cool in pan on a wire rack for 10 minutes. Remove from pan. Cool completely on wire rack. Wrap and store overnight before slicing. Makes 1 loaf (14 servings).